Overview
This is an HDMI to CSI camera port adapter designed for Raspberry Pi with up to 1080p@30fps support from HDMI input, backward compatible. It allows you to use HDMI cameras just as the standard Raspberry Pi CSI cameras, all versions of Raspberry Pi series boards are supported.
Specification
- Controller: TC358743XBG
- Input signal:
- Video: HDMI1.4, RGB888, supports up to 1080p@30
- Audio: HDMI audio
- Output signal:
- Video: 2 lanes MIP CSI-2
- Audio: I2S audio output, LPCM format
- OS: Raspberry Pi OS
- Working voltage: 3.3V
- Working temperature: -30° ~ 70°C
Connection
- Video

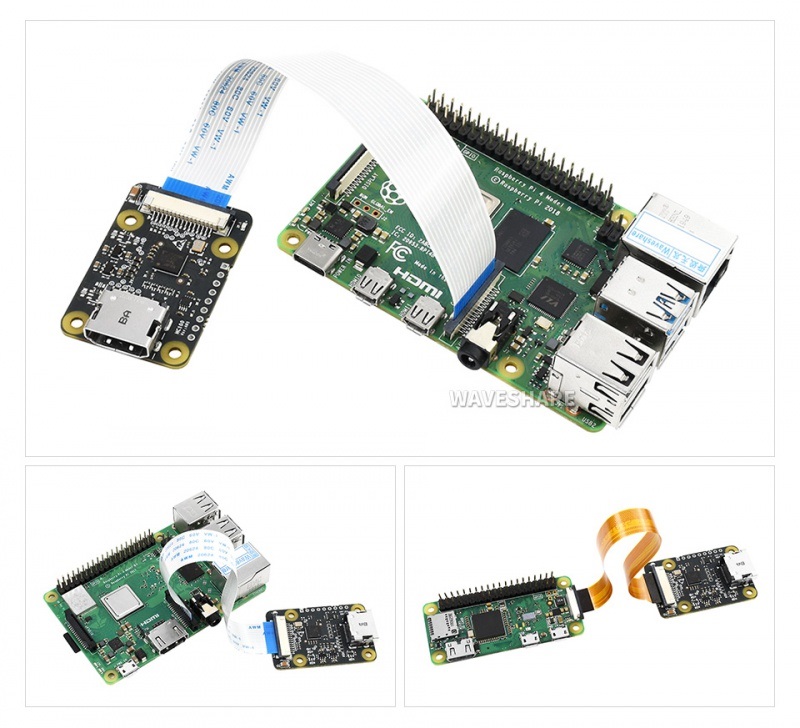
Connect the FPC cable of Raspberry Pi to the CSI interface of Raspberry Pi. The CSI interface of Pi 2B, 3B, 3B+ is located between the LAN port and HDMI port. The CSI interface of Pi 4 is placed between the HDMI1 interface and the audio jack. If you use Pi zero, the CSI interface is beside the Power port. Here is the diagram of Pi 4. 4B
Note that the silver side (metal side) should be toward the HDMI interface. Release the black buckle, align the FPC cable and insert it tightly, then close the black buckle.
- Audio
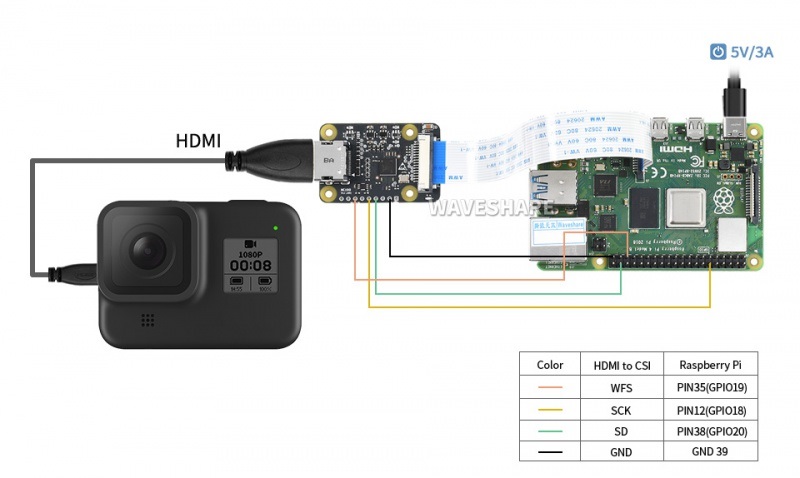
To use the audio, you need to jumper wire the following gpio to the I2S pins of the Raspberry Pi board.
| HDMI to CSI | Raspberry Pi |
|---|---|
| WFS | GPIO19 |
| SCK | GPIO18 |
| SD | GPIO20 |
| GND | GND |
Software Setup
Method 1. Enable Lagence camera
- Open Raspberry Pi terminal and update
sudo apt-get update
- Enable Legacy camera
sudo raspi-config
- Choose Interface Options -> Legacy Camera Enable -> Yes
- Reboot
sudo reboot
- Test the adapter with the following command
sudo raspivid -t 0
Methord 2: Use V4l2
- Add the following line to /boot/config.txt file
- for Pi3, Pi 4 or Pi zero
dtoverlay=tc358743
- For CM4
dtoverlay=tc358743,4lane=1
- If you need to use audio function, please add the following line as well (optional)
dtoverlay=tc358743-audio
- Add the following content to /boot/cmdline.txt (Note that do not append new line to the file, just add it)
cma=96M
- Download the scirpt to Raspberry Pi and install it.
cd
wget https://www.waveshare.com/w/upload/8/89/TC358743-Driver.zip
cd ~/TC358743-Driver
sudo sh set_edit.sh
- Rebot the Pi
sudo reboot
- Test the video (yavta)
cd ~/TC358743-Driver/yavta/yavta/
./yavta --capture=1000 -n 3 --encode-to=file.h264 -f UYVY –m -T /dev/video0
- The codes will capture 100 famerates and save to file.h264 file, you can use vlc tool to play the file
- Test the video (gstreamer)
- Install the tool
sudo apt install gstreamer1.0-tools -y
- Recording
gst-launch-1.0 -vvv v4l2src ! "video/x-raw,framerate=30/1,format=UYVY" ! v4l2h264enc extra-controls="controls,h264_profile=4,h264_level=13,video_bitrate=256000;" ! "video/x-h264,profile=high, level=(string)4.2" ! h264parse ! queue ! matroskamux name=mux ! filesink location=file.mkv
- Test audio (gstreamer)
- Check the audio devices with arecord -l command.
**** List of CAPTURE Hardware Devices ****
card 2: tc358743 [tc358743], device 0: bcm2835-i2s-dir-hifi dir-hifi-0
[bcm2835-i2s-dir-hifi dir-hifi-0]
Subdevices: 1/1
Subdevice #0: subdevice #0
- Note: The card 2 is the ID of the soundcard
- Record the audio and save it as wav file
arecord -D hw:2 -d 25 -f cd test1.wav


